|
|
|
Cone filter Air Box
| Cold air
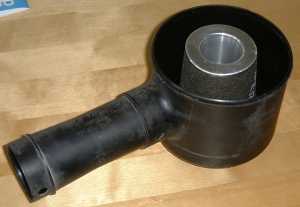
good, hot air bad. An important facet of performance tuning is ensuring that the engine receives as much dense air as is possible. And usually this means plenty of cold air. Why cold air? Because cold air is denser than hot air, and therefore contains more oxygen with which to burn the fuel entering the engine. How is this relevant to the MGF? The standard airbox is a compromise design that incorporates an airbox containing a paper panel filter which in turn is routed through a resonance box and then to the intake some 3 metres away from the throttle body. This air intake is located above the rear of the rear sub-frame - an area where Paul Sharpe's measurements have shown is the coolest in the engine bay. Unfortunately, the convoluted air intake tract robs the engine of high velocity flow air, and thus limits top end power. Therefore there are huge advantages to be seen by removing the standard inlet system, junking it in favour of a high flow cone filter attached to the throttle body. However, there is a problem: the ambient air in the engine bay that the cone filter uses is heated up by the engine- so the engine is forced a diet of hot, thin air. Not great for the ultimate performance gains. Even systems such as the K&N 57i represent a compromise- whilst it uses a couple of cold air ducts to deflect cold air from under the car into the vicinity of the cone filter, the system is reliant on the car's forward motion to get that cold air to the filter. Moreover, the cold air that is ducted to the filter only 'dilutes' the hot air already trapped in the engine compartment. Not great news- but there are solutions available. The Enclosed filter system. An enclosed air induction kit is the obvious solution to the 'hot air' problem. By enclosing the filter and isolating it entirely from the warm ambient air in the engine bay, and ensuring that the air being ducted into that environment is drawn from outside the car where the air is cooler, then you have an ideal solution to our excessively warm intake charge problem. There are an increasing number of kits that are coming available that promise to achieve just this. Moreover, through clever design of the airbox and intake throat, a certain amount of ram-air effect can be built in to accelerate the intake charge to the airbox, and actively draw more air into the filter to the benefit of higher end power. What's the catch? Technically, there are very few catches. If the airbox is well designed, it will work as the manufacturers claim. But developing these kits properly costs money- and the manufacturers want a return on their investment. As a result the kits costs are high to ensure this return and as a result 250 to 350 UKP are not uncommon recommended retail prices. Compared to a K&N 57i that can cost anywhere between 85-100, these kits represent a sizeable additional investment- especially if you've already invested in a cone filter that may need to be junked in preference to these kits. An alternative solution? Well yes, there are a few alternative solutions that can provide surprising results for very little outlay. If you haven't yet invested in a cone filter, then you might want to consider a panel filter inside the existing air box. If you disconnect the standard airbox from the remainder of the air intake system and route a tube from the airbox to the near-side air-vent, then purely through the expedient of junking a considerable amount of the existing air intake length, surprising power gains can be had- see here for power figures recorded by Bruno. If you already have a cone filter, ensure that it has some cold air ducts positioned to deflect air from under the car to the filter a la K&N 57i. The next step is surprisingly simple- use some alloy chimney ducting and construct a heat shield around the filter. This seriously simple modification results in stunning improvements in torque on the road- and comes highly recommended (see here for a picture). The next step is to construct one's own air enclosure. Here the flower pot modification recommended by a number of Lotus Elise owners is a very cost effective way of constructing an effective shield against radiant heat. Whilst the end result looks some thing like you'd seen on Blue Peter as a child, you can't argue with the end result- more tractable power. And here's another way, using parts raided from Austin-Rover's past. In this case, I have obtained an old cylindrical airbox from a Rover 820 EFi. Dimentionally it is almost identical to the ITG filter box- the only difference being the design of the intake path to the air box (it isn't designed to take advantage of the ram-air effect). But it has a number of useful features. It is robustly constructed, with the filter in situ there is about 35 mm of clearance in all directions, and astonishingly, the K&N filter sits snugly in place, and needs no further fixing in the air box when the lid is snapped shut. (The Pipercross filer used here for photographic purposes is 5 mm longer than the K&N cone and therefore would necessitate a small and easy modification to the lid to fit). The plan is to fit this air box (which cost the princely sum of Ł5 from a scrap yard) and compare it with more costly airbox options from ITG and others. These results and fitting instructions for the above bargain-basement air box system are to follow. Thanks to Roger Parker for the suggestion for using the Rover 820 airbox. |
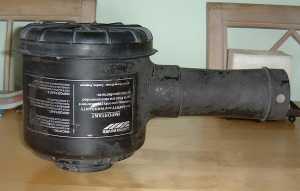 Side view of Rover 820 airbox. |
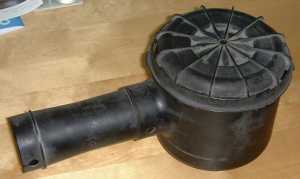 820 airbox from above, with lid in place. |
|
 Inside the 820 airbox. |
|
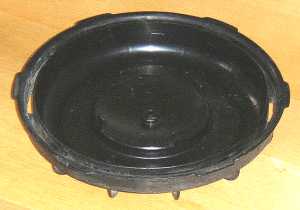 Lid of airbox- it just clicks into place. |
|
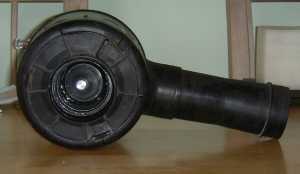 Underneath the airbox- peering into filter. |
|
 Good clearance all around the cone filter. |
|
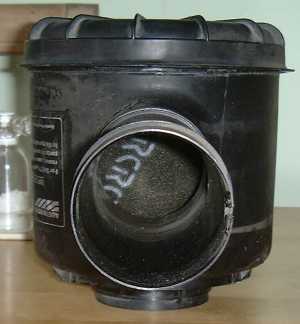 See the cone filter through air intake duct. |